
Bed rails are baby safety products designed to prevent babies from falling off the bed while they are active or sleeping on the bed.
When babies are 3 months old, they gradually learn to roll over and crawl, and caregivers inevitably have occasional lapses in attention.
With a bed rail for infant, adults can feel more at ease while babies play within the safety range of the rails, and children can play more happily!
Three common types of bed rail for infant on the market
Foldable type: can be folded and stored, making it convenient to use.
Vertical sliding type: can be lowered on one side, making it easy for caregivers to use with one hand;
Fixed type: easy to install and comes in various shapes.

CHOCCHICK has introduced 9 highly popular bed rail for infant along with market preferences, and continually developing with updates in raw materials and opening mechanisms.
These include the premium model 2.0, the cost-effective model 2023, and the mid-range model 2025, suitable for most families.
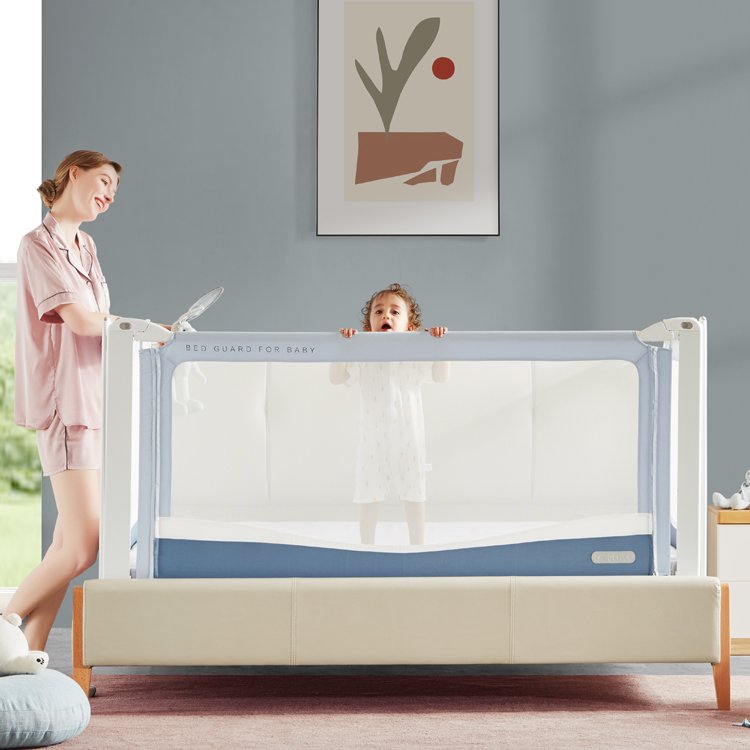
Premium Queen Bed Rails for Toddlers
Certified fall protection queen bed rails that comply with EU safety standards. Safe bed guard for babies and children.
Features:
-
- Certified fall protection: certified bed rails that comply with EU safety standards. Safe bed guard for babies and children.
- Flexible and adjustable: height adjustable (80-105 cm) and length (90-200 cm) for individual needs – yes, also fall protection bed 200 cm.
- Travel friendly & easy to install: Easy to install without drilling. Our bed rail is also designed as a travel bed guard.
- Robust and pet hair resistant: bed fall protection for babies and children available in light grey and dark grey.
- Comfortable access: 3-step security lock for unmatched security and quiet nights.
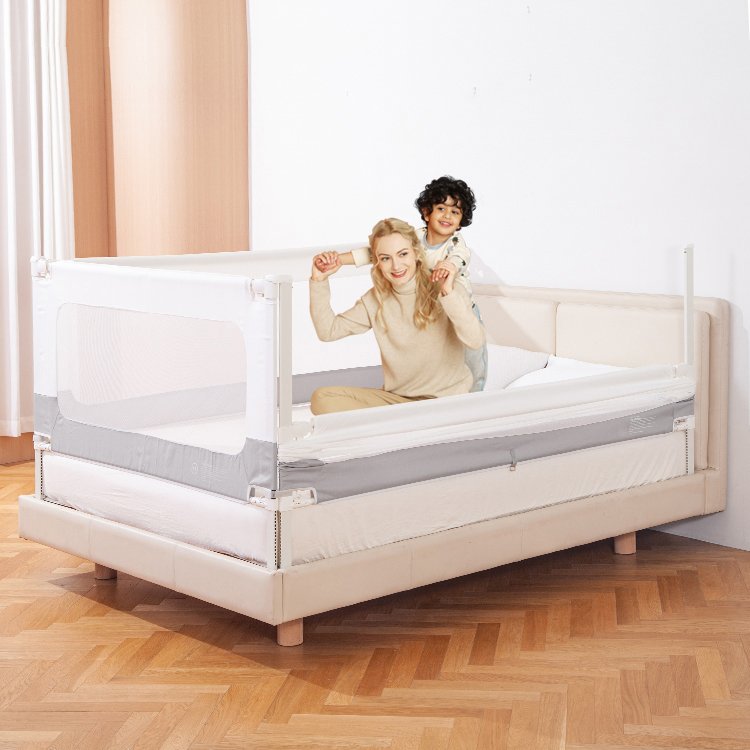
Bed Rails for Toddlers
Comprehensive Bed Rails for Toddlers: Secure, Durable, and Essential for Retail and Wholesale
Features:
- Stable and safe: bed rail for toddlers with our robust fall protection.
- For various beds: with 18 adjustable levels, the bed protector adapts to almost all bed models and mattresses up to 30 cm high.
- Child safety: thanks to the innovative DoubleClick system.
- Quiet comfort: the bed rail can be quietly lowered and allows gentle entry without much climbing or rustling.
- Easy to assemble: in just 5 steps, the fall protection is set up and ready to use thanks to understandable instructions.
Despite the variety of styles, we remain true to the original purpose of product production, always prioritizing the safety performance of our products to protect every baby.
Installation of Our Latest bed rail 2025

First, determine the applicable range of the bed:
There should be at least a 1cm gap between the bed frame and the mattress, allowing the insertion of the bottom bracket so that the mattress can press down on the rail for stability.
It is generally suitable for standard beds but unsuited for irregular beds, round beds, or adjustable beds.
The common bed sizes currently available on the market are:
1.2*2.0m, 1.8*2.0m, 2.0*2.0m, 1.5*2.0m, 1.5*1.9m, and 2.0*2.2m. When choosing the size, parents should first determine which side they want to use the bed rail on, and then select the size accordingly.
The size of the single bed rail should match the side of the bed where it will be used to maximize the product’s functionality and prevent falls in the unprotected areas.
For example, if your bed size is 1.8*2.0m and you want to surround all four sides, you should choose two 1.8m rails and two 2.0m rails.
This way, the entire bed will be enclosed, and your baby can move around more safely. Please refer to the following picture for selecting the bed rail size.

bed rail Installation steps
Step 1: Check if All Components are Complete
The bed rail mainly consists of two parts: the fabric cover and the pipe fittings.
Distinguish the upper horizontal pipe, lower horizontal pipe, left and right pillars, fabric cover, and bottom bracket.
The plastic bag will have labels to facilitate identification.
Step 2: Connect the Upper and Lower Horizontal Rods
Press the spring ball and insert it for connection. Listen for the “click” sound to ensure the retaining spring is in the locked position.
The spring ball protruding from the slot indicates a proper connection.
If the spring ball does not protrude, check if the slot on the pipe fitting aligns with the spring ball.
The spring ball will only protrude from the slot when aligned. Ensure all spring balls protrude from the slots.
Normally, there are two sections; if there is an extension pipe, connect it in the middle.

Step 3: Horizontally Insert the Upper and Lower Horizontal Pipes into the Fabric Cover
Ensure the fabric cover is flat and both ends are in the same position.
Note that the logo on the fabric cover should face outward.
You can determine the correct installation by checking the direction of the spring ball at the connection between the upper horizontal rod and the pillar.
The spring ball facing inward indicates correct installation.

Step 4: Install the Left and Right Pillars
Distinguish the left and right pillars based on the labels on the plastic bag, and vertically insert the pillars into the fabric cover.
Press the spring balls at both ends of the upper and lower horizontal rods to connect the left and right pillars to the horizontal rods.
Simultaneously press the round buttons on both sides of the pillars to unlock, allowing the upper horizontal rod to automatically lower.
Pull up forcefully with one hand, and you will hear a “click,” indicating it is locked.
If the horizontal rod does not lower when pressing the buttons, check the tension of the fabric cover.
If it is too tight, the cover will be difficult to move, affecting functionality; if it is too loose, it won’t provide adequate protection.
Ensure the fabric cover is flat and smooth so that the caregiver can easily open and close the bed rail.
Step 5: Install the Bottom Bracket
Push the blue button outward and insert the bottom bracket to complete the installation.
Adjust the height of the bottom bracket according to the height of the mattress, ensuring that the position of the lower horizontal rod closely aligns with the topmost layer of the mattress.
The 2025 model allows height adjustment from 71cm to 101cm, with 24 adjustable levels.
If pressing the blue button does not allow height adjustment, check if the button is fully pressed and cannot be moved further, and ensure the base is stable before adjusting the height.
The adjustment method is shown in the diagram below:


By following these steps, the bed rail for infant installation will be secure and provide maximum protection for your child.
The 2025 model uses screws for fixation. This is because, aside from box-type bed frames where the mattress is less likely to move, common bed types like flat beds have mattresses that easily shift, making screw fixation more secure.
Adjust the position of the bed rail, take out the screws included in the package, and fix the base and bed board with screws to complete the installation.
Adjacent bed rails will have L-shaped connectors at the top, also fixed with screws for additional stability.

Recommended Installation Based on Baby’s Age
| Babies’s age | Babies’s activities | How many pieces of bed rail to install |
| 0-6 months old | In a long sleep state | One or two sides |
| 6-12 months old | can crawl and roll over | Two or three sides |
| over 12 months old | more active | All four sides for comprehensive protection |
We can customize appropriate outer boxes based on your sales needs, with combinations of 2-piece, 3-piece, and 4-piece packages available.
conclusions
As a professional supplier of baby products, CHOCCHICK will have experienced inspectors to strictly focus on and inspect these accessories before the products are ready for shipment.
If your customers report that there is a problem with the product, we will quickly provide accessory replacement services to ensure that you always have strong support during the sales process!
For more information, please contact us.


